How to Write a Blog Post (Easy Guide With Examples)
Want to start blogging but don’t know where to begin? Whether this is your first blog post or you’ve already written a few but want a clearer, more structured approach, this guide will walk you through the process step-by-step. From brainstorming ideas to hitting publish, read on for practical tips, real examples, and easy-to-follow advice to help you create engaging, well-organized blog content that your readers will appreciate.
Quick steps to write a blog post (TL;DR)
If you’re short on time, here’s a simple checklist to help you write a good blog post from start to finish. You can follow these in order and come back later for more detailed tips.
- Pick a topic your audience cares about
- Research your topic and what’s already out there
- Outline your main points using a simple template
- Write a catchy blog title that grabs attention
- Start with an engaging introduction to hook readers
- Write clear, useful content in short paragraphs and bullet points
- Add visuals (images, screenshots, charts) to support your message
- Format your post with headings (H2s, H3s) for easy reading
- Optimize for SEO: use keywords naturally in your title, headings, and meta description
- End with a clear call to action (CTA)
- Proofread and publish
As you follow these steps, you might find it helpful to use QuillBot’s blog post generator to create a first draft. It’s a great way to organize your ideas quickly, but remember your voice and expertise are what will bring the post to life.
Step-by-step guide
Whether this is your first blog or you’ve written a few and want to improve your process, breaking it down into smaller, manageable steps will help you create clear and engaging content. This section offers practical tips and examples to guide you through each stage, allowing you to write with confidence and clarity.
1. Pick a blog topic and know your audience
Before you start writing, get clear on who you’re writing for and what they need to know:
- Are they beginners, experts, hobbyists, or professionals? The clearer you are, the easier it is to tailor your content.
- What questions do they have? What problems are they trying to solve?
This step is crucial because a blog that’s relevant and useful to your readers is the one that gets read and shared.
Use free tools like Google’s autocomplete or a keyword planner to see what questions people are asking about your topic. This helps you pick a blog idea that’s actually being searched for, not just something you think sounds cool.
Pro tip: If you’re struggling to find the right blog topic, free tools like QuillBot’s content idea generator can help by suggesting relevant ideas based on your keywords or themes.
2. Research your topic and competition
Before you start writing, spend 30–60 minutes researching your topic and seeing what’s already out there. This step ensures you create something valuable and unique.
Here’s how to efficiently research your topic:
- Find popular questions: Check out the “People also ask” section of the Google results page when you search for your topic. These are real questions people want answered.
- Check what’s ranking: Look at the top 5–10 articles for your topic. What are they covering? What questions are they missing?
- Look for content gaps: Can you explain something more clearly? Add personal experience? Include more recent information?
- Find supporting facts: Look for statistics, studies, or expert quotes you can reference to back up your points.
Pro tip: Don’t aim to copy what others are doing—aim to do it better or differently because it’s your unique perspective and experience that will make your blog post stand out.
3. Outline your blog post (with example)
An outline acts like a roadmap; it keeps your writing focused and organized. Here’s a simple template to get you started:
- Introduction: Hook readers and introduce your topic
- Main Point 1: First key idea or step
- Main Point 2: Second key idea or step
- Main Point 3: Third key idea or step
- Conclusion: Summarize and include a call to action
Remember, outlines evolve as you write, so don’t be afraid to adjust them along the way.
Step 1: Choose the right location and assess your space
Step 2: Pick beginner-friendly plants and vegetables
Step 3: Gather essential tools and prepare your soil
Step 4: Plant, water, and maintain your garden
Conclusion: Encourage readers to start their gardening journey today
Tip: Use bullet points or numbered lists in your outline for clarity.
4. Write a blog title that gets clicks
Your title is your first impression. It should be clear, relevant, and pique the readers’ curiosity or promise a benefit. Use numbers, questions, or power words like “ultimate,” “easy,” or “step-by-step” to grab attention.
“10 Easy Vegetables Anyone Can Grow at Home”
“The Ultimate Beginner’s Guide to Container Gardening”
Tip: If you’re struggling to come up with a strong title, try QuillBot’s AI SEO title generator. It can help you brainstorm multiple variations and find the perfect one for your topic.
5. Create an engaging introduction
Your intro should grab the reader’s attention in the first few sentences and explain what they’ll learn.
“Gardening is one of the most rewarding hobbies you can start, and it’s easier than you think. Here’s a simple process to grow your own food at home.”
Tip: Use a question, a surprising fact, or a brief story to hook readers.
6. Write clear, engaging content
Keep your paragraphs short—around 4 to 5 sentences—and focus on one clear idea at a time. Avoid jargon and write in your own words, like you’re explaining something to a curious friend. Use a warm, informal tone that lets your personality come through, but remember, a blog is meant to be helpful and relatable, not a personal diary.
- Use examples or anecdotes to connect with readers.
- Ask questions to keep readers interested.
- Vary sentence length for better flow.
- Add your opinions or experiences where relevant.
7. Format your blog for easy reading
A well-formatted post invites readers to stay. Break your content into sections with headings (H2, H3), and use bullet points or bold text to highlight key ideas.
Tip: Large blocks of text are tiring to read; use spacing and visuals to give readers’ eyes a break.
H2: Step 1 – Choose the Right Location
(This marks a main section of your post—easy for readers and search engines to spot.)
H3: Sunlight and Soil Quality
(This subheading breaks down a specific detail under the main section.)
(Bullet list) Tips:
- Pick a spot with at least 6 hours of sunlight
- Test your soil’s pH level
- Avoid areas with poor drainage
Notice how the headings guide readers through the post logically, while bullet points make key tips easy to scan. You can apply this exact structure to any topic—whether you’re writing about hiking, tech tutorials, or lifestyle tips. The goal is always the same: to make your content easy to follow and reader-friendly.
8. Add images and visuals
Visuals do more than decorate—they help explain your points and keep readers interested. A good image or screenshot can simplify what might take a whole paragraph to explain. Visuals like checklists and infographics are especially useful for “how-to” or “tips” articles, where readers appreciate quick, skimmable summaries.
Tip: Don’t forget to add alt text to your images. It improves accessibility and helps search engines understand your content.
- A photo showing different container sizes for various vegetables
- A visual checklist for essential gardening tools (Pro tip: You can easily create one using QuillBot’s AI Checklist Generator)
- A simple infographic showing planting schedules by season
9. Optimize your blog post for SEO
Sure, SEO can get technical, but you don’t need to worry about that right now. There are simple things you can do to optimize your blog for search engines and make it easier to find.
- Keyword placement: Use your main keyword naturally in your title, at least one subheading, and within the first 100 words of your introduction. This helps search engines understand what your post is about (i.e., think about where you glance first when reading an article; search engines do the same).
- Meta description: Write a clear, inviting meta description (about 150–160 characters) that includes your keyword and encourages readers to click through.
- Links: Add 2–3 links to other posts on your blog to keep readers exploring your site (if this is your first post, you can add these later). Also include 2–3 external links to trustworthy sources like expert articles, studies, or helpful tools that add value to your post. Both types of links help search engines understand your content better.
- Descriptive URLs: Use simple, keyword-rich URLs like yoursite.com/start-vegetable-garden instead of random numbers or codes. It’s better for both readers and search engines.
Remember: Write for humans first, optimize for search engines second. Quality content that genuinely helps readers will always outperform keyword-stuffed articles.
10. End with a clear call to action (CTA)
When you create a blog, you’re probably aiming for more than just sharing information; you want your readers to take action. Perhaps you want them to sign up for your newsletter, purchase an online course, download an e-book, or simply engage with your content. That’s why a clear call to action is essential.
Tell your readers exactly what you want them to do next. Whether it’s subscribing, purchasing, downloading, or commenting, a strong CTA guides your audience toward your blog’s purpose and keeps them involved.
“Ready to take your skills to the next level? Enroll in our online blogging course today!”
“Download our free ebook to master blog writing step-by-step.”
“Have questions? Drop a comment below—we’d love to hear from you.”
11. Proofread and publish
Before you hit “publish,” take time to carefully proofread your post. Check for spelling mistakes, grammar errors, and awkward sentences. Reading your work aloud can help you catch issues you might miss when reading silently.
Use tools like QuillBot’s Grammar Checker to give your writing a final polish—they’re great for spotting errors and improving clarity.
Publishing your blog is an exciting step, but remember: quality matters. A clean, error-free post builds trust with your readers and shows you care about your content.
Writing your first blog post might feel overwhelming, but remember that every successful blogger started exactly where you are now. Focus on being helpful rather than perfect; your readers will appreciate authentic, useful content over polished but empty writing.
- Use AI for brainstorming and structure: For help with outlines, headline ideas, or when you’re stuck on how to explain something
- Keep your personal experience central: AI can’t replicate your specific knowledge, stories, or perspective; that’s what makes your content valuable
- Always fact-check: AI can make mistakes, so verify any claims or statistics before publishing
- Edit and personalize: Use AI-generated content as a starting point, then rewrite it in your own voice. Humanizing AI content is crucial for maintaining authenticity and reader trust
- Be transparent: If AI significantly helped create your content, consider mentioning it to maintain trust with readers
Remember: Readers come to your blog for your insights and experiences. AI should enhance your writing process, not replace you as a writer.
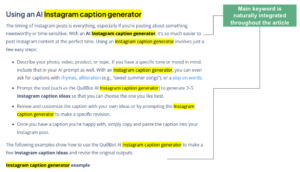
Example of a blog post
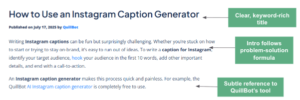
Here’s a real example of a well-structured blog post from QuillBot on how to use an Instagram caption generator that puts many of these blog writing principles into practice.
Title and intro
The title is clear, rich in keywords, and immediately informs readers about the content. It employs the effective “How to” formula, keeping it simple. There is no clickbait or fluff; it offers a direct promise of utility.
The introduction opens with a relatable challenge: “Writing Instagram captions can be fun but surprisingly challenging.” It quickly reassures the reader there’s a solution and mentions the QuillBot tool without being overly promotional.
Title and intro
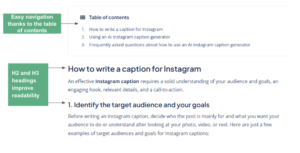
Structure and formatting
The post features a table of contents that makes navigation easy, especially for longer articles.
Clear H2 and H3 headings label each section and sub-step, breaking the content into manageable parts.
Numbered steps help guide the reader through the process, and short paragraphs make it ideal for mobile reading, avoiding large blocks of text.
Structure and formatting
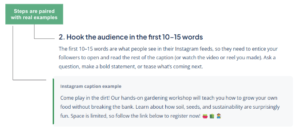
Breaking down information into clear, manageable steps, paired with real examples, helps readers better understand and apply the advice.
Showing concrete examples makes the guidance feel practical and achievable rather than abstract.
Clear steps and examples
Visuals
Screenshots throughout the post visually demonstrate how the Instagram caption generator works, making the content more interactive and easier to follow.
Screenshot (how to prompt the tool)

SEO Elements
The target keyword appears naturally in the title, introduction, headings, and throughout the body of the post.
Descriptive headings further help search engines understand the flow and focus of the content. Importantly, the keywords are integrated smoothly without stuffing, ensuring the text reads naturally.
Keyword use
By following these clear steps and learning from real examples, you’re well on your way to writing blog posts that engage readers and achieve your goals. Keep practicing, and watch your blogging skills grow.
Frequently asked questions about how to write a blog
- What should I write my first blog post about?
-
In your first blog post, you can introduce yourself or a topic you’re passionate about—ideally both. If it’s a personal blog, a short introduction helps readers understand who you are, what you’ll be writing about, and the reason you’re starting a blog. But instead of just talking about yourself, consider what your audience might be looking for. Share your perspective on a topic that matters to you and offers value to your readers. It’s a great way to connect and set expectations from the beginning.
If you’re not sure where to begin, try using QuillBot’s content idea generator to brainstorm topics that match your niche.
- How do I write a travel blog post?
-
Start by choosing a specific location, experience, or theme (like food, hiking, or local culture). Then structure your post around your personal insights: what you did, what you learned, and what you’d recommend. Use clear headings, vivid descriptions, and practical tips to make your post both engaging and useful. Don’t forget to include photos or links to helpful resources if possible.
QuillBot’s blog post generator can help you organize your thoughts, create an outline, and draft your travel content faster.
- How do I come up with blog post ideas?
-
Generating blog ideas starts with knowing your audience and what they want to learn. Use resources like Google’s “autocomplete” or “People also ask” features as well as keyword planners to find popular questions related to your niche. You can also brainstorm based on personal experiences, trending topics, or common challenges your readers face.
For a quick boost, try QuillBot’s content idea generator. It can help you develop fresh, relevant blog topics tailored to your needs.
- How often should I post on my blog?
-
Post as often as you can consistently maintain without compromising quality. For most bloggers, once a week or every two weeks works well. Consistency builds audience trust and improves SEO. Quality beats quantity every time.
Before publishing, use QuillBot’s Grammar Checker to polish your writing and avoid mistakes.
Cite this QuillBot article
We encourage the use of reliable sources in all types of writing. You can copy and paste the citation or click the "Cite this article" button to automatically add it to our free Citation Generator.
Nikolopoulou, K. (2025, October 28). How to Write a Blog Post (Easy Guide With Examples). Quillbot. Retrieved March 2, 2026, from https://quillbot.com/blog/content-writing/how-to-write-a-blog/