The Design Thinking Process Explained Simply
The design thinking process is a way of solving problems by starting with the people you’re solving them for, rather than jumping straight to solutions. It helps you understand real needs, explore different directions, and improve ideas through iteration.
Although it’s often used in team settings, the process also works well when you’re developing ideas on your own.
In this article, you’ll learn how the design thinking process works and how to apply its five stages in practice—even as a solo creator, educator, or communicator.
Design thinking is all about testing and refining ideas, and that applies to how you express them, too. Quillbot’s Paraphraser can help you explore alternative versions of a sentence as you iterate.
Key takeaways
- The design thinking process is a user-focused, iterative approach to solving problems by understanding needs, exploring ideas, and refining solutions through feedback.
- It follows five stages: empathize, define, ideate, prototype, and test, but the process is non-linear in practice.
- It prioritizes real user needs and early testing over assumptions or fixed, final solutions.
- It is commonly used in team settings, but it can also be applied effectively by individuals across writing, teaching, and other creative or problem-solving work.
Table of contents
- What is the design thinking process?
- How the design thinking process works
- Step 1: Empathize
- Step 2: Define
- Step 3: Ideate
- Step 4: Prototype
- Step 5: Test
- Design thinking process examples in real life
- Common mistakes and how to avoid them
- Frequently asked questions about the design thinking process
- Other interesting articles
What is the design thinking process?
Design thinking is a problem-solving approach that originated in fields like product design—think of a toothbrush shaped to fit a child’s grip. It later spread to business, education, healthcare, and beyond.
It gained wider recognition in the 1990s through IDEO, a design and innovation company, and the Stanford d.school later formalized it into a five-step process: empathize, define, ideate, prototype, and test.
Instead of assuming you know the answer, in design thinking you observe real needs, generate ideas, and refine them through testing. The key word is iterative: solutions improve in cycles, not all at once.
While design thinking is often described in team settings, the underlying approach works just as well for one person.
- A teacher wants to understand why students keep struggling with the same assignment
- A newsletter writer wants to find out why her readers are disengaging
- A course creator wants to make sure her new module actually addresses what her audience needs
In each case, the logic is the same: start with people, test early, and improve as you go.
How the design thinking process works
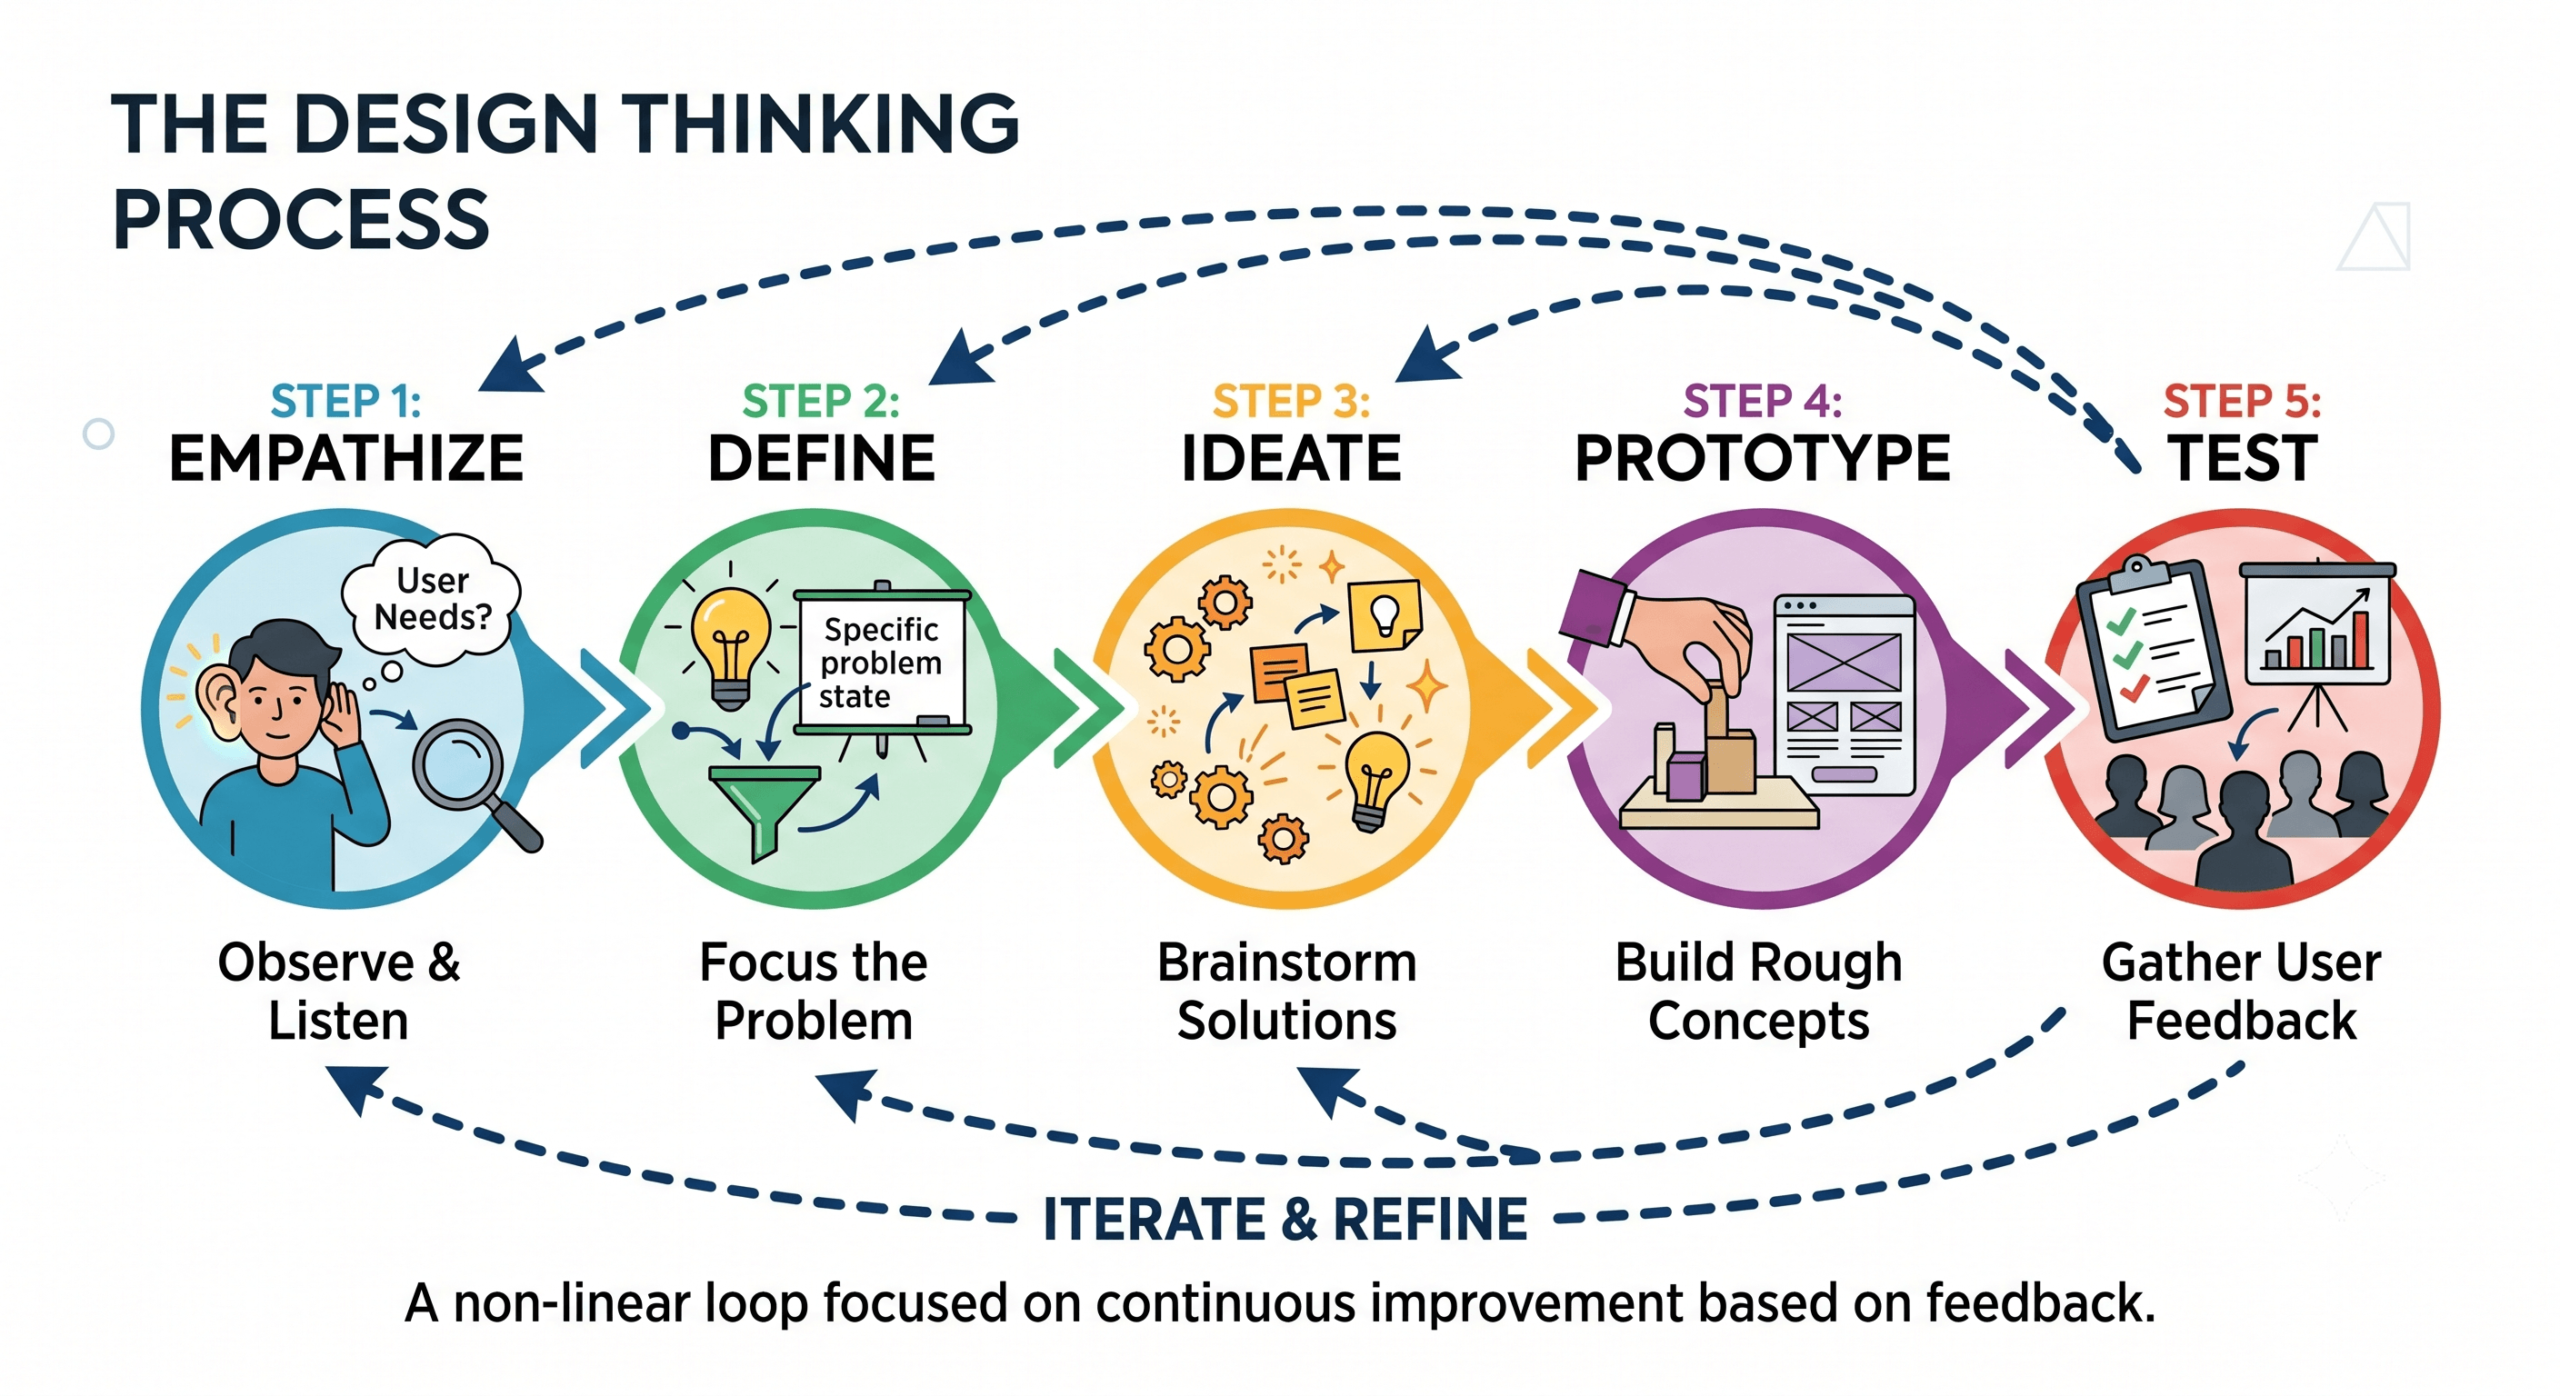
Different frameworks describe design thinking in slightly different ways; some include up to seven stages. In this article, we focus on the widely used five-stage model developed by the Stanford d.school.
- Step 1: Empathize
- Step 2: Define
- Step 3: Ideate
- Step 4: Prototype
- Step 5: Test
Step 1: Empathize
Spend time understanding the people you’re trying to help. This means noticing what they struggle with, what they need, and how they currently experience the problem.
Step 2: Define
Take what you’ve learned and turn it into a focused problem statement. The d.school calls this a “point of view”: a clear articulation of who you’re designing for, what they need, and why. A narrower, sharper problem statement leads to better solutions than a vague one.
Step 3: Ideate
Think of as many possible solutions as you can. At this stage, the goal is quantity and variety, not choosing the “perfect” idea. Brainstorming techniques like mind-mapping, sketching, or freewriting will help you look at problems from different angles.
- Why budgets fail after the first month
- Common budgeting mistakes beginners make
- Emotional spending habits
- Simple ways to stay motivated when budgeting feels restrictive
Rather than choosing one immediately, she selects two directions to explore further.
Step 4: Prototype
Turn one or more ideas into something simple and concrete. This could be a rough version, a draft, or a basic model that helps you see how the idea works and how others respond to it.
Instead of writing the full article, she keeps both versions short so they are easy to test and revise.
Step 5: Test
Share your prototype with real users, observe their reactions, and use what you learn to improve your idea.
Based on that feedback, she develops the second angle into the final article.
While the stages are usually presented in order, the process is not strictly linear. In practice, you often move back and forth between steps as you learn more and refine your ideas.
Design thinking process examples in real life
The design thinking process becomes easier to understand when you see it in action. Below are two real-world examples that show how it works step by step.
Empathize: After a particularly low-scoring round of submissions, she stays after class and asks a small group of students to walk her through their approach to the assignment. The content doesn’t appear to be the issue. Most students understand the material. However, when it comes to writing up their answers, they struggle to translate what they know into a structured argument. It turns out this is a skill the course had never directly addressed.
Define: Her point of view is that students who understand the material are losing marks because the course assumes they already know how to write academically, a skill that has never been explicitly taught.
Ideate: She explores several possible directions: adding a short writing workshop before the assignment, revising the brief to include clearer step-by-step instructions, creating a full example of a strong academic paragraph, or breaking the assignment into smaller staged submissions.

Prototype: After weighing the options, she rules out the workshop because there isn’t enough time before the submission deadline, and the staged submissions, which would require a full restructure of the course. Two ideas feel worth testing together: a revised brief with clearer instructions, and a short guide—“How to structure your argument”— with a basic example of how an idea can be turned into a paragraph. She asks a small group of students to review both and flag anything that feels unclear or unhelpful.
Test: She releases both to the whole class at the start of the assignment. The revised brief gets little attention—most students skim it as they always have. The guide, however, gets used actively. Grades improve, but she notices some students are copying the example too closely instead of applying the underlying logic. She drops the revised brief and focuses her energy on improving the guide, adding two contrasting examples rather than a single model answer, and makes a note to introduce it earlier in the course next time.
Another example shows how design thinking works in a completely different context.
Empathize: He visits a nearby community centre and asks a small group of residents to show him how they decide what goes in which bin. Most are genuinely trying to recycle correctly. The problem seems to be the official guidance, which is a dense, two-page list of materials written in technical language that is hard to parse on the spot.
Define: His point of view becomes: residents who want to recycle correctly are still making mistakes because the instructions are too complex to use at the point of decision—standing at a bin, bag in hand.
Ideate: He explores several possible directions: a simplified one-page leaflet, a visual poster for the bin area, a short explainer video for social media, and a colour-coded sticker system for bins. Rather than choosing immediately, he prioritises the two options that could be tested quickly and with minimal resources.

Prototype: He creates rough versions of a simplified leaflet and a visual poster. He then tests them with residents from a different community centre in the same area, to avoid bias from prior exposure. Participants are asked to sort a set of common household items using only the new guidance, simulating real-life decision-making at the bin.
Test: Both prototypes perform better than the original instructions, but the poster proves easier to use in context, as residents can scan it while standing at the bin. However, there’s still some confusion around plastic film and coffee cups, which are not clearly addressed. He revises these sections using clearer icons and adds a short note: “If in doubt, leave it out.” The updated version is then rolled out across the neighbourhood.
Common mistakes and how to avoid them
Here are some common pitfalls beginners often overlook at each stage of the design thinking process.
| Step | Common mistake | How to avoid it |
|---|---|---|
| Empathize | Relying on assumptions instead of real user input | Observe users, ask questions, or look at real behavior before drawing conclusions |
| Define | Writing a vague or overly broad problem statement | Narrow it down to a specific user, need, and context |
| Ideate | Choosing the first good idea instead of exploring alternatives | Generate multiple options before deciding what to test |
| Prototype | Making prototypes too detailed too early | Keep prototypes simple and focused on learning, not perfection |
| Test | Treating feedback as confirmation instead of learning | Look for patterns in user reactions and use them to refine your idea |
Frequently asked questions about the design thinking process
- Can you use the design thinking process on your own?
-
Yes, you can use the design thinking process on your own. While design thinking is often applied in collaborative settings, it is also highly effective for freelancers, solo creators, and educators working independently.
The trick to doing it alone is not simulating the audience in your head. When you work in a team, you bounce ideas off colleagues; when you work alone, you must bounce your ideas directly off your end-users.
If you’re developing an idea, tools like Quillbot’s AI Writer can help you sketch out and compare different versions as you iterate.
- Are the stages in the design thinking process always sequential?
-
No. Although the design thinking process is often shown as a step-by-step sequence, in practice it is not strictly sequential.
As you work through a problem, you may move back and forth between stages, revisit earlier ideas, or develop and test concepts alongside ongoing research. New insights often reshape your understanding of the problem, which can lead you to rethink earlier stages or adjust your direction.
Rather than a fixed order, the stages are better understood as connected modes of thinking that support an ongoing, iterative process.
If you’re still unsure about parts of the design thinking process, Quillbot’s AI Chat can help you break them down and get clearer answers.
- What is the difference between design thinking and traditional problem-solving?
-
The main difference between design thinking and traditional problem-solving lies in where you start and how you deal with uncertainty or failure.
Traditional problem-solving is usually linear: you start with an assumption about the solution, plan in detail, build, and test at the end. If it doesn’t work, time and resources have already been spent.
The design thinking process flips that order. It starts with understanding the people experiencing the problem, tests ideas early and in rough form, and treats feedback as information throughout the process— not as failure at the end.
If you still have questions, Quillbot’s AI Chat can help you unpack the differences and understand how each approach works.
Other interesting articles
If you want to know more about colors, letters, or the meaning of emojis, make sure to check out some of our other articles with explanations and examples.