Lesson Planning Guide | Steps, Examples & Template
Lesson planning helps you stay organized, focused, and prepared to support your students. But knowing what to include in a lesson plan and how to leverage your teaching ideas can take some practice.
An effective lesson plan gives you a clear roadmap for teaching your students while aligning the activities with what students need to learn. The most common lesson plan format includes an objective, learning standards, materials, instructional procedures, and an assessment.
This guide covers what to include in a lesson plan and walks you through the process, step-by-step. You’ll also find a free lesson plan template that you can download and adapt for your classroom.
Need help getting started? Quillbot’s AI Chat can help you brainstorm ideas, activities, and assessments based on your learning objectives.
Key takeaways
- A lesson plan organizes the objectives, standards, materials, instructional activities, and assessment for a lesson.
- Backward design helps teachers plan assessments and instruction around the learning outcomes they want students to achieve.
- A lesson plan template can provide a consistent framework for planning and organizing instruction.
Lesson plan format
A lesson plan organizes all of the details about a lesson into separate sections with clear headings so that you have a clear visual reference while the lesson is in progress. The most common format includes the date, grade level, and academic subject along with headings for each part of the lesson to help you align instruction to students’ needs.
| Heading | What to include |
|---|---|
| Topic | The main topic that the lesson focuses on |
| Unit | The unit that the lesson is part of |
| Objective | The main goal of the lesson, which is the skill or knowledge that students will be able to demonstrate in an assessment at the end |
| Standards | A list of the state standards or other educational standards that the lesson will address |
| Materials | A list of the tools, texts, printouts, and supplies that you’ll have ready when the lesson begins |
| Procedure | The steps that you’ll use to teach the skill or content, which often include:
|
| Assessment | An assignment at the end of the lesson, where students independently demonstrate understanding so that you can find out whether they met the objective (aka independent practice) |
Lesson plan template (free PDF download)
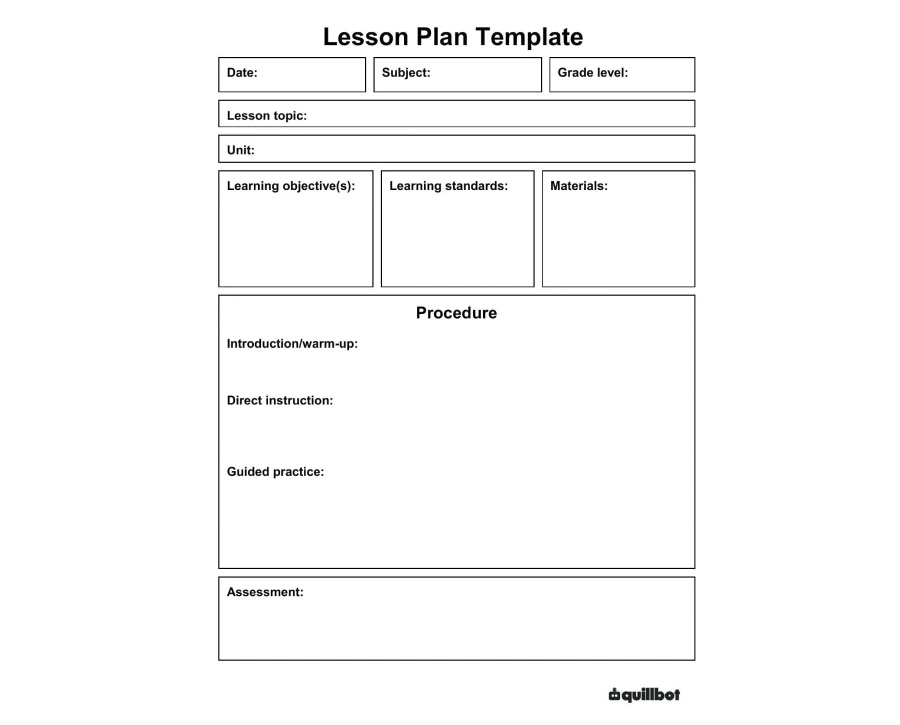
Before diving into the step-by-step planning process, download this free lesson plan template to use as a guide. It includes dedicated sections for your objectives, standards, materials, procedures, and assessment so you can organize your ideas all in one place.
How to write a lesson plan step-by-step
With your template ready, you can start building your lesson. One of the most effective ways to plan a lesson is through a process called backward planning (or backward design). Instead of starting with classroom activities, backward design focuses on your end goals first: You plan the instruction only after establishing what your students need to achieve.
To use the backward design process, follow four main steps:
- Choose the standard and objective.
- Assess student readiness.
- Design the assessment.
- Plan the instructional procedure and materials.
The sections below explain the backward design process in more detail.
Step 1: Choose the standard and objective
Start by reviewing the learning standards that the unit is targeting, choose one of those standards, and then select a specific skill or concept to cover in the lesson, which will be the lesson objective. The learning standards may come from your school district, your state’s education department, or a professional organization.
Step 2: Assess student readiness
Next, review (or collect) data about your students’ current level of understanding to diagnose what they still need to learn in order to meet the goal. This data can come from standardized tests, homework assignments, writing samples, or observations.
For example, at the beginning of the unit, you might give a pretest or in-class writing prompt to diagnose students’ skill levels and identify the gaps to fill.
The process of gathering information about students’ readiness (or the activity you use for this purpose) is called formative assessment. The process of planning a lesson that aligns with students’ past performance is called data-driven instruction.
Step 3: Design the assessment
Create or choose an assignment that students will complete at the end of the lesson to demonstrate what they learned. This assessment should directly measure the lesson objective rather than simply asking students to recall the information covered during instruction. As you’re making the assignment, ask yourself:
- What criteria will I use to grade and evaluate students’ work?
- What steps and strategies will lead to high-quality work?
The answers to these questions will help you choose the most relevant information and activities for the lesson.
Step 4: Plan the instructional procedure and materials
With a clear idea of what students already know and how you’ll assess learning, you’re ready to decide how to teach the content or skill and what materials are best for your students. The goal is to fill the gap between what students know now and what they should know when the lesson is over. The instructional procedure often includes three parts:
- Introduction/warm-up to prepare students for the information, such as a quick writing prompt, discussion, game, or video clip
- Instruction, where you demonstrate the skill and articulate the steps or thinking procedures that are involved
- Guided practice, where students start practicing the skill while you help and observe (or in small groups where they can help each other)
If you’re creating worksheets or reading materials from scratch, tailor those to students’ learning levels (and other educational needs) as well.
If you notice any widespread gaps or patterns, reflect on ways to adjust future teaching strategies and materials to students’ needs.
Lesson plan examples
Ready to see how all these pieces come together? Below are two complete lesson plan examples that demonstrate how to adapt this basic format to different subjects and grade levels. Use them as models when filling out your own template.
| Grade level | 8 |
| Academic subject | Language arts |
| Lesson topic | Evaluating sources for credibility and bias |
| Unit topic | Writing a 5-paragraph essay |
| Learning objective | Students will evaluate search engine results pages and online articles to assess source credibility using a standardized checklist, identifying at least two indicators of reliability or bias per source. |
| State standard | Kansas Department of Education W.8.8, “Gather relevant information from multiple print and digital sources, assess the credibility of each source, and quote or paraphrase the data and conclusions of others while avoiding plagiarism and providing basic bibliographic information for sources.” |
| Materials |
|
| Procedure | Introduction:
|
Instruction:
|
|
Guided practice:
|
|
| Assessment | Each student enters a search phrase related to their individual essay topic, selects three different search engine results, and completes the checklist for all three results to turn in at the end of class. |
| Grade level | 5 |
| Academic subject | Math |
| Lesson topic | Finding the volume of rectangular prisms |
| Unit topic | Volume and spatial reasoning |
| Learning objective | Determine the volume of right rectangular prisms with whole-number edge lengths |
| Common Core standard | CCSS.MATH.CONTENT.5.MD.C.5, “Relate volume to the operations of multiplication and addition and solve real-world and mathematical problems involving volume.” |
| Materials |
|
| Procedure | Introduction:
|
Instruction:
|
|
Guided practice:
|
|
| Assessment | Exit ticket with three word problems:
|
Frequently asked questions about writing lesson plans
- What is a backward design lesson plan?
-
A backward design lesson plan is designed by working backward to decide how you’ll help students achieve the lesson objective. To use the backward design process, follow these steps:
- Identify the learning objective: Define the specific knowledge, skill, or concept students should learn by the end of the lesson.
- Gather data about students’ level of readiness: Consider students’ current level of proficiency in order to tailor the lesson to their needs.
- Create an assessment: Develop an assignment that measures whether students have achieved the learning objective.
- Choose lesson activities and materials: Create an instructional plan and choose or create materials that fill the gap between what students know now and what they need to know to succeed on the assessment.
Need help with lesson planning? Ask Quillbot’s AI Chat to brainstorm lesson activities and assessment ideas that align with your learning objectives.
- What does a lesson plan look like?
-
A lesson plan looks like a chart or a list with headings for the different parts of the lesson, such as:
- Lesson topic
- Unit topic
- Learning objective
- Learning standards addressed
- Materials needed
- Procedures
- Assessment
Quillbot’s Lesson Plan Generator is a fast and free way to explore examples of lesson plans for different subjects.
- What is the difference between formative and summative assessment?
-
Formative assessment is an ongoing process that teachers use to monitor student learning and adjust instruction based on what they discover. It can include quizzes, writing prompts, discussions, exit tickets, and other activities that provide evidence of students’ understanding during a lesson or unit.
Summative assessment evaluates how well students have met learning objectives at the end of a unit or course, often through a final exam, project, or other graded assignment. While formative assessment helps teachers decide how to adjust instruction, summative assessment measures what students have learned.
Understanding the difference between formative and summative assessment helps teachers choose the best instructional strategies for their students. Quillbot’s AI Chat can help you brainstorm ways to use effective strategies in your classroom.
Other interesting articles
If you want to know more about colors, letters, or the meaning of emojis, make sure to check out some of our other articles with explanations and examples.Cite this Quillbot article
We encourage the use of reliable sources in all types of writing. You can copy and paste the citation or click the "Cite this article" button to automatically add it to our free Citation Generator.
Routh, N. (2026, October 17). Lesson Planning Guide | Steps, Examples & Template. Quillbot. Retrieved October 23, 2026, from https://quillbot.com/blog/education/lesson-planning/